How to highlight the syntax for any languages and script like html, xml, python, C, C++, Java, groovy etc in a super easy way using Syntax Highlighter (by Alex Gorbatchev). Though this library is available for quite a long time but there are still doubts and difficulty faced by new programmer. This guide will help you get your code working in perfect 5 mins or less !!
1. Overview
This article consists of complete working code, with steps to for syntax highlighting and publishing of code in website, blog or html.
2. Prerequisitions
- Syntax Highlighter CSS: (shThemeDefault.css, shCore.css)
- Syntax Highlighter JS: (shCore.js)
- Syntax Highlighter Brushes: (depending on which language/script you want to highlight. For e.g. shBrushJScript.js, shBrushXml.js)
3. Steps to highlight syntax and publish your code
Below are the end to end steps for using Syntax highlighter.
- Download following essential CSS and Javascript and put it in a directory(let's name: 'syntaxhighliter')
Note: Brush files are language/script specific, so use only really required brush files in your html page instead of including of all languages. Also, you can download the sample code of this article(Link in last section) where you will find all required css and js as listed below- shThemeDefault.css: Download Link
- shCore.css: Download Link
- shCore.js: Download Link
- Let's us say if you want to syntax highlight html, javascript and Java. So download: shBrushXml.js Download Link
- shBrushJScript.js: Download Link
- shBrushJava.js: Download Link
- shBrushPython.js: Download Link
- Include required CSS and JavaScript from above downloaded list in your '.html' as shown in code below between line number 6-10
- Include command for applying syntaxhighlighter to all the pre tag with Brushes as shown in code below between line number 67-70
- Include the code to be displayed in page inside pre tag as shown in below code
- HTML example: Line number: 16
- JavaScript example: Line number: 30
- Java example: Line number: 42
- Python example: Line number: 53
- Important :It is always better idea to escape following characters while displaying html inside your page:
- " to replaced with "
- & to replaced with &
- < to replaced with <
- > to replaced with >
The easiest way to do so is an online tool for escaping and de-escaping html: freeformatter.com
If you have followed above mentioned 5 steps, then the below code in Section.4 Working sample code will render following UI.
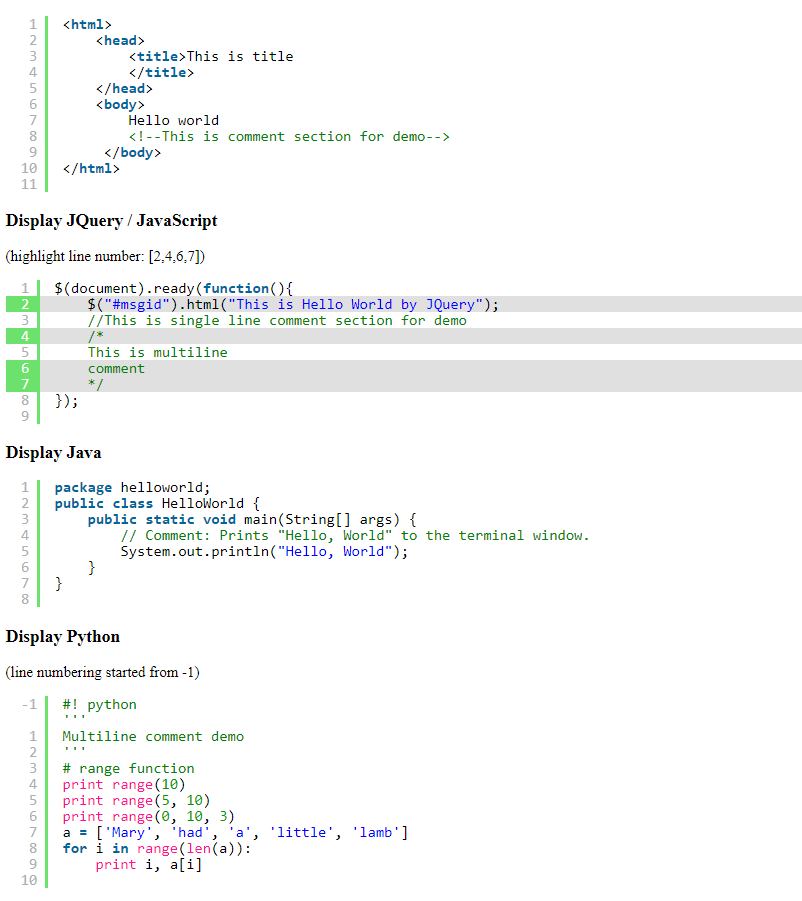
4. Working sample code
Below is the Working sample code:
<html>
<head>
<title>Sample code for syntaxhighlighter usage</title>
<link rel="stylesheet" href="../../../libs/syntaxhighlighter/shCore.css">
<link rel="stylesheet" href="../../../libs/syntaxhighlighter/shThemeDefault.css">
<script type="text/javascript" src="../../../libs/syntaxhighlighter/shCore.js"></script>
<script type="text/javascript" src="../../../libs/syntaxhighlighter/shBrushJScript.js"></script>
<script type="text/javascript" src="../../../libs/syntaxhighlighter/shBrushXml.js"></script>
<script type="text/javascript" src="../../../libs/syntaxhighlighter/shBrushJava.js"></script>
<script type="text/javascript" src="../../../libs/syntaxhighlighter/shBrushPython.js"></script>
</head>
<body>
<h3>Display HTML </h3>
<pre class="brush: html; first-line: 1;">
<html>
<head>
<title>This is title
</title>
</head>
<body>
Hello world
<!--This is comment section for demo-->
</body>
</html>
</pre>
<h3>Display JQuery / JavaScript </h3> (highlight line number: [2,4,6,7])
<pre class="brush: js; html-script: false; first-line: 1; highlight: [2,4,6,7]">
$(document).ready(function(){
$("#msgid").html("This is Hello World by JQuery");
//This is single line comment section for demo
/*
This is multiline
comment
*/
});
</pre>
<h3>Display Java </h3>
<pre class="brush: java; html-script: false;">
package helloworld;
public class HelloWorld {
public static void main(String[] args) {
// Comment: Prints "Hello, World" to the terminal window.
System.out.println("Hello, World");
}
}
</pre>
<h3>Display Python </h3>(line numbering started from -1)
<pre class="brush: python; first-line: -1;">
#! python
'''
Multiline comment demo
'''
# range function
print range(10)
print range(5, 10)
print range(0, 10, 3)
a = ['Mary', 'had', 'a', 'little', 'lamb']
for i in range(len(a)):
print i, a[i]
</pre>
<!-- Highlight all -->
<script type="text/javascript">
SyntaxHighlighter.all()
</script>
</body>
</html>
5. Points to be noted
Few points to be noted
- Escaping and descaping is essential matra for html display.
- If you are willing to display a HTML code with javascript in it. Use <pre class="brush: js; html-script: true;">
- One can customize the line number display by using attribute in pre class: <pre class="brush: js; html-script: true; first-line: -3; highlight: [1,12]">.
Similarly for highlighting particular lines, provide the list of line number as follow: <pre class="brush: js; html-script: true; first-line: -3; highlight: [1, 2, 3, 9,12]"> - Once you have included the brush file for any language or script, remember to use that in pre tag's class
- It is better to download minimized version of all css and javascript file instead of debug mode. Keeping minimized version makes website loading faster as it's size is quite smaller. Download minimized version from CDNJS
Here is a quick video about how to install and start using Syntax Highlighter
6. How to remove Credit toolbar from syntaxhighlighter
If you have followed this tutorial so far and able to highlight code using syntaxhighlighter, you must have noted the presence of green colored toolbar icon on top-right corner. Clicking which takes us to Credit pop-up dialog box for SyntaxHighlighter
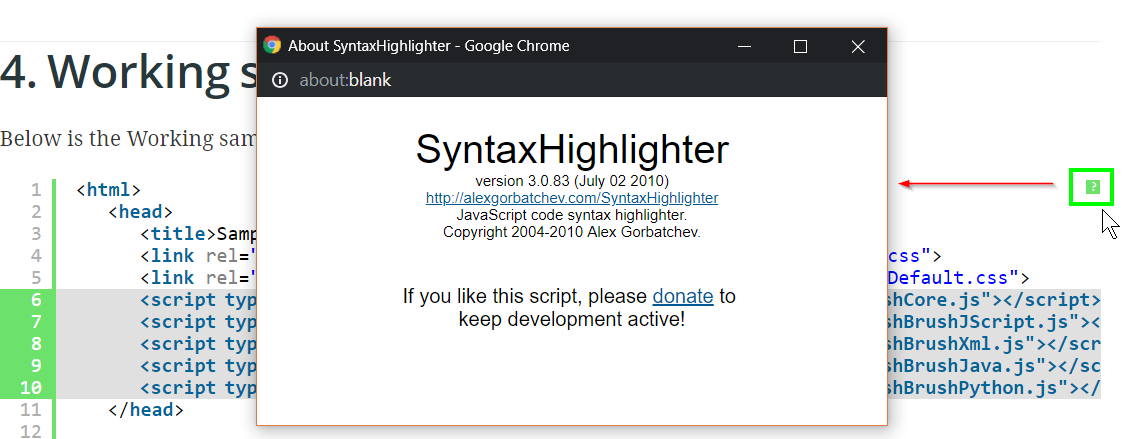
Due to several reasons, one would wish to remove the green toolbar icon from syntaxhighlighter division. It is possible to do in following ways
CSS Method
In file 'shThemeDefault.css' add property fordisplay: none;inside, selector:'.syntaxhighlighter .toolbar 'JavaScript statement Method
Just before the closing of<body>tag, alongwith statementSyntaxHighlighter.all();include this statementSyntaxHighlighter.defaults.toolbar = false;orSyntaxHighlighter.defaults['toolbar'] = false;
7. Download this complete example
Download links
Thank you for reading it all along. Hope you liked this article!!
About the author